Flyer Rigging Guide
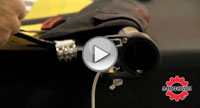
FLYER RIGGING VIDEO
Designer Bruce Peterson explains the assembly and rigging of the cambered Flyer sail.
1. Use the right mast
The FLYER sails from 3.9 to 7.0 m² sizes are designed for Reduced Diameter Masts (RDM), and the camber system cannot be used with a Standard Diameter Mast (SDM). The Flyer 8.2 is designed for a Standard Diameter Mast (SDM), and the camber system cannot be used with a Reduced Diameter Mast (RDM).
The FLYER sails have a closed top mast sleeve and are intended to be rigged with base extension only. There is no adjustable headcap strap, so it is not possible to use a mast that is longer than the rigged luff length of the sail.
For the optimum and intended performance, please use a Sailworks Flightstick or Nolimitz Sumo RDM mast for the 3.9 to 7.0 sizes. For the optimum and intended performance on the Flyer 8.2, please use a Sailworks Lightstick or Joystick SDM mast. Other RDM or SDM masts may possibly be compatible, but differences in the curve and stiffness of those masts will alter the intended shape and tension profile of the FLYER sails.
Mast length requirements by sail size:
- FLYER 3.9 requires a RDM 370
- FLYER 4.5 requires a RDM 370
- FLYER 5.2 requires a RDM 400
- FLYER 6.0 requires a RDM 430
- FLYER 7.0 requires a RDM 430
- FLYER 8.2 requires a SDM 460
2. Insert the mast
Roll out the sail with the zipper ports (starboard side) up. The zipper ports should all be closed to prevent the mast coming out the zipper port while rigging. The boom opening is between the two diamond shaped cut-outs in the mast sleeve. Invert (push back) entire the section of the mast sleeve between the two cutout to expose the entire boom opening. The boom opening is constructed this way, with small cutouts top and bottom and a back flap, so as to minimize water entry into the mast sleeve via the boom opening.
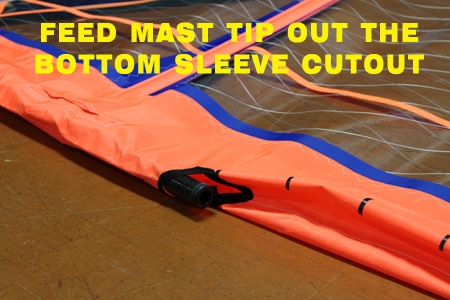
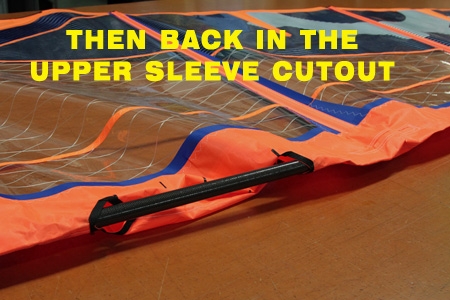
Slide the mast up the mast sleeve, passing the mast tip through the lower camber inducer, then out the sleeve at the lower boom cut-out, then back in the sleeve at the upper boom cut-out, then up the sleeve through the upper camber inducer. Keep the cambers on the mast while pushing the mast up the mast sleeve. Use the handle at the bottom of the sail to hold the sail as you push the mast into the sleeve. You will need to move your hands up to the boom opening area and work the mast up to the top of the sleeve while pulling the upper camber inducer down the mast. It may may feel very tight to insert the mast on the first rigging, but this will ease up once the sail has be used a few times.
The mast sleeve top on the FLYER sails is closed off with a double-overlapped, Spectra reinforced webbing. There is no plastic headcap or stem to seat into the mast - just push the mast to the top and go on rigging. Do check that the two-piece coupling of your mast is fully joined completely before applying downhaul tension.
If the cambers come off the mast you can either start again by removing, or you can continue rigging, pull 1/2 downhaul tension, attach your boom and pull full outhaul tension, then open the zipper port and push down on the batten from above along the luff seam and up on the camber from below, to ease the camber back onto the mast.
3. Attach the mast base
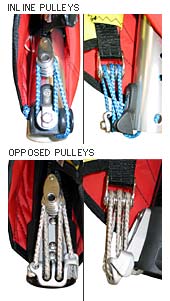
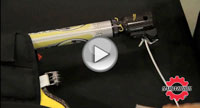
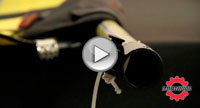
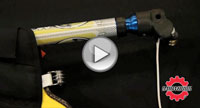
Set your mast base extension to the require height needed, i.e. luff length printed on the sail minus mast length. Your downhaul pulley system should have 6:1 purchase and 3.5~4.0 mm Spectra/Dyneema line to make downhauling smooth and easy. Lace the downhaul line, but note that some mast bases, like Streamlined, have pulley systems that are aligned with the tack pulley on the sail. Other mast bases, like Chinook, have pulley systems that are 90 degrees opposed to the tack pulley on the sail. There are different downhaul line lacing methods for each base style to ensure that the sail pulley is drawn straight down and not twisted. Refer to the photos and video clips below for each downhaul lacing method.
The FLYER sails have a very straight (flat) luff curve, and by design are very easy to downhaul. Pull the downhaul 3/4 tight, or about what is easy to achieve without using a hand cleat or rig winch. It is much easier to attach the boom (the next step) if the downhaul is not fully tensioned yet.
Mast Base Downhaul Lacing Videos
Streamlined Inline PulleysTop View |
Streamlined Inline PulleysSide View |
Chinook Opposed PulleysTop View |
Chinook Opposed PulleysSide View |
|
|
|
|
|
4. Attach the boom
If you plan to use an adjustable outhaul system, set that up on your boom before attaching the boom to the mast. Follow the instructions enclosed with the adjustable outhaul for setup and use.
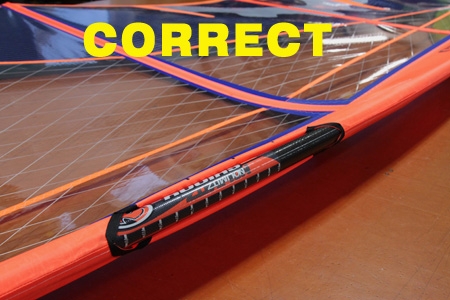
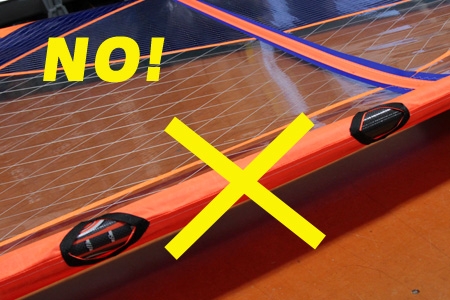
Adjust your boom to the length specified for the sail. Attach the boom at your preferred boom height. If in doubt, attach it to the mast at the middle of the boom opening and re-adjust it after the sail is fully rigged.
Be careful not to attach it too high in the boom opening, as you must account for the sail to be downhauled further. Also be careful not to pinch the mast sleeve or your uphaul line under the boom clamp. Do not set the outhaul yet.
5. Tune the downhaul setting
Each FLYER sail has a small solid "half-cog" logo positioned at the front of the top mini batten. Use this small cog logo as a visual reference mark to achieve the desired leech looseness. The target setting for all-around foiling conditions is to pull the downhaul until the leech looseness extends just up to the small cog logo.
If needed, use an easy-rig or downhaul crank so that it is easier to make these next settings.
For lighter wind conditions, when pumping is required to create the momentum necessary for foiling, the FLYER sails will be more effective with slightly less downhaul. Set the downhaul so the leech looseness only extends up to 7-10cm (3-4") behind the small cog tuning mark. This downhaul setting will reduce the leech twist (making the sail more powerful), while increasing the leech tension for a whippier pumping response.
To ensure that the sail is tuned properly, you must make a judgment upon the wind conditions you are about to use the sail in, and tune the sail according to your size, skill and abilities to handle those conditions.
To ensure that the sail is tuned properly, you must make a judgment upon the wind conditions you are about to use the sail in, and tune the sail according to your size, skill and abilities to handle those conditions.
6. Tune the outhaul setting
Release any outhaul tension and allow the sail to relax naturally. Pull the outhaul a minimum of 2 cm (3/4") from this neutral position. Cleat off the outhaul line.
Less outhaul makes the sail fuller, moves the center of effort (power) further back, and creates more power for accelerating and deep reaching. This setting can be harder to control when over-powered or sailing upwind.
More outhaul makes the sail flatter, moves the center of effort (power) further forward, and creates a lean, tight foil that is more efficient for upwind sailing or over-powered conditions.

By design, the FLYER sails are very responsive to changes in outhaul settings and we recommend that you use an adjustable outhaul system to get the full range of each FLYER sail size. The obvious benefits of the adjustable outhaul system is the ability to flatten and tight the sail slightly when over-powered or foiling upwind for stability and control. Inversely, loosening the outhaul for a fuller, softer sail is beneficial for lighter winds and foiling downwind. There is a particular benefit to the adjustable outhaul in the low end, right at the foiling threshold.
These small outhaul changes can then be made on the fly while sailing to greatly expand the wind range of the sail. Note that having and using an adjustable outhaul system does not replace or negate the importance of proper downhaul tuning. Set the downhaul first to match the wind conditions, and then adjust your outhaul settings.
6. Tension the battens
The battens are tensioned using the hex-key tool found under the Velcro tab above the tack handle. Insert the hex-key into the cap screw at the leech end of each batten.
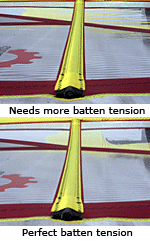
Turn the hex-key to the right (clockwise) to tighten, JUST until the small wrinkles across the batten pockets disappear (see photos). You should see a smooth reflection in the surface, with no wrinkles perpendicular to the batten pockets. Batten tension should be tightest on the lower battens and feathered back to "just snug" at the top batten. Note that the batten tension will not cross-tension the mast sleeve at the cambers. There is a seperate, one-time setup, for shimming the camber inducers (see below).
Replace the hex-key tool back in its pocket above the tack handle. The batten tension will need to be re-tightened after the initial few uses as the sail stretches and sets into its final shape. Once the batten tension is set, it’s not necessary to release batten tension after each session.
7. First-time rigging - Shimming the camber inducers
- Follow the rigging steps outlined above to properly assemble the sail. To tension the mast sleeve you must adjust the camber shims that are inserted between the camber inducer and the plastic batten stop that is riveted to the front of the batten pocket.
- Check the cross tension on the mast sleeve by pinching the very front edge of the mast sleeve directly in front of the camber. This slack in the mast sleeve is what the camber shims push out.
- Estimate the slack at each camber and insert shims approximately 2-4mm less than what you can pinch. For example, if you can pinch 10mm of slack in the mast sleeve at the camber, then insert a shim of 6mm or 8mm. This slack of 2-4mm will ensure the cambers can still rotate smoothly while filling out the extra sleeve width.
- Each batten will vary in the camber shims required due to the manufacturing tolerance and the variation in mast diameters. Check each camber and record the amount of shim required.
- De-rig the sail and remove the mast.
- Open the zipper ports in the mast sleeve to access the cambers.
- Remove the camber and add the appropriate amount of camber shim required.
- The camber shims are located in the sailbag pocket and come in three thicknesses, 2mm, 4mm and 6mm. The shims are stackable on top of each other to make 8mm, 10mm, 12mm, etc. shim thicknesses.
- Slide the camber shims over the plastic batten stop and then replace the camber.
- Re-rig the sail following the steps described above to check the mast sleeve tension from the camber shims you have added.
- Repeat the camber shimming step described here if additional shims are necessary.
- When properly shimmed, you should be able to pinch 2-4mm of sleeve material in front of each camber on a fully rigged and tensioned sail. While it is possible to shim out the mast sleeve so that it is completely tight, this small amount of slack allows the sail to rotate smoothly and improves rig handling.
8. Sail Maintenance
- Shake the sand off before rolling up your sail at the beach, as this will help keep the monofilm clear. Most scratches are caused by sand and grit abrading the sail while it’s rolled up.
- Prevent creases in the monofilm by rolling your sail tightly and using the bungee Snap Tie to keep it rolled tightly and store the sail where it won’t get flattened.
- Rinse with fresh water occasionally, including inside the mast sleeve and around the camber inducers, to avoid salt and sand buildup.
- Avoid rigging on hard or abrasive surfaces.
- If left rigged for extended periods, release the outhaul and downhaul.
- Store your rigged sail out of direct sunlight. Prolonged exposure to the sun’s rays will degrade the sailcloth.
- Repair tears promptly through a qualified sail repairperson. Make temporary repairs to the monofilm or X-ply with Mylar packing tape or a sticker on both sides.
- Do not use solvents for cleaning near seams, as this will dissolve the seam tape adhesives. Use water and mild soap. To remove tar spots or sticker adhesive residue use a citrus based cleaner.
- When leaving your sail unattended on the beach, secure it from blowing away.
- Avoid getting sand or dirt inside the mast sleeve and batten pockets. This reduces sail performance by increasing friction and wear on the mast and battens.
- Loosen the batten tension if you are not going to use the sail for an extended period.
- Check the non-skid texture on your board. Very coarse or excessively distributed non-skid on the rails around the mast step and at the nose can badly damage the sail. Lightly sand the texture down with some fine sandpaper so that it is less abrasive to the sail.