
|
||
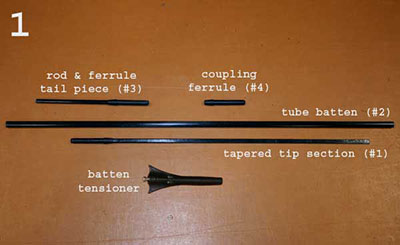 |
1. Batten Parts:The tube/rod style of batten we use are found in our NX, Retro, Hucker and older Bravo and Winduro sails. These batten are made up of three sections: |
|
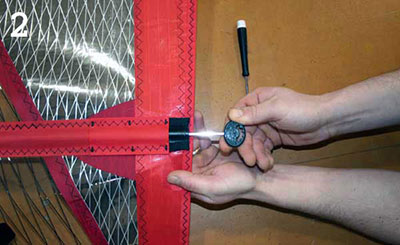 |
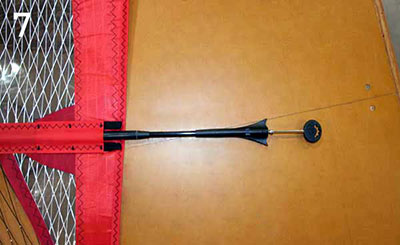
2. Batten Removal:With the sail de-rigged and on a solid surface, remove the batten tensioner by loosening the tensioner screw with the Hex Key by turning in a counter clockwise rotation. Make sure the tensioner screw is backed off but not completely removed from the nut. |
|
 |
3. Push the Batten Tensioner into the Pocket:Use the palm of your hand on the end of the hex key tool to push the batten tensioner into the batten pocket. This will slacken the webbing straps from the tensioner. |
|
 |
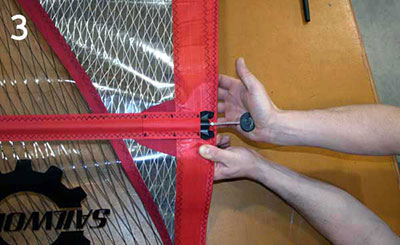
4. Remove the webbing from the Batten Tensioner:With your thumbs, pry the webbing off the wings of the SBT. If needed you can use a small flat head screwdriver to help pry the webbing off |
|
 |
5. Slide the Tesioner out:Once the webbing is pulled clear of the SBT, slide the tensioner out to where you can get a good hand-hold on it while maintaining contact with the batten inside. Lever the tensioner to one side, which will help grip the batten and pull to remove. |
|
 |
6. If you're unable to pull the Batten out:If you are unable to pull the batten out using the above method, use a pair of needle nose pliers. Reach into the batten pocket, grabbing hold of the tailpiece. A quick pull will break loose a sticky batten. If the batten hangs up in the batten-stop, have someone hold the luff sleeve in place while pulling the batten out. |
|
 |
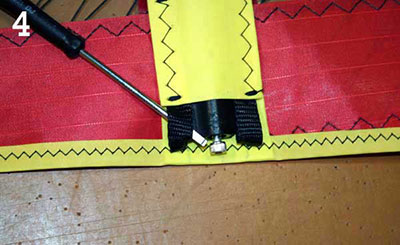
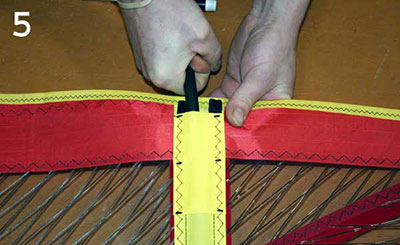
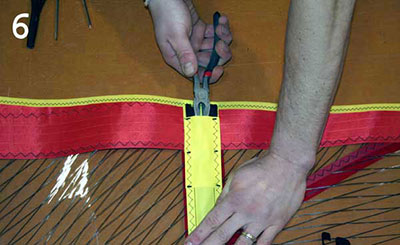
7. Re-install the Batten:Insert replacement or repaired batten back into batten pocket. Slide SBT onto batten tailpiece. Make sure the tension screw is backed out. Insert SBT hex key and firmly push batten into pocket until it is fully seated into batten-stop. Position webbing back over the wings of the tensioner. If needed use a small flat head screwdriver to slide under the webbing and lifting it over the wings of the plastic batten tensioner (do NOT use the Sailworks hex key to lever the webbing in place as it can be bent by doing this). See photo #5. |
|
 |
8. Removing Broken Batten Tips:If the batten is broken and the tip is stuck in the batten pocket you will need to lay the sail on a solid surface and with one hand push on the front of the batten or cam toward the leech, while the other hand will hold the batten pocket down firmly. The sail will bunch together between your hands (see photo 8a). Next, transfer your weight onto your hand to hold the batten in place, while pulling the sail away from the batten tip (see photo 8b). This will release the broken batten tip from the batten stop and allow you to slide it back within the batten pocket. Continue this process until the batten tip is clear of the batten stop. |
|
 |
9. Push the broken Batten out:To push the broken batten section along in the batten pocket, apply pressure to the tip of the batten with your thumb, or a hard blunt object like a spoon. As the broken batten approaches the leech end of the batten pocket, you may need to sleeve inside the batten pocket with thin flat ruler or a dinner knife to guide the end of the batten through the stepped layers of the batten pocket. Once near the end you can reach in with a pair of needle nose pliers to remove the batten section. If the batten is damaged in such a way that splinters are impeding its removal, you will need to unpick a small section of the batten pocket stitching to slide the batten out through this small opening and then re-stitch the batten pocket with a sewing machine. |
|
 |
10. Tube and Tailpiece Replacement:If the tube section is crushed or split but is removed intact, leaving the tip section inside the batten pocket, then simply measure the assembled length of the damaged tube and tailpiece for a replacement. Slide the new tube section back into the batten pocket without the glue. You will feel the tube piece come in contact with the ferrule of the tip piece, continue to push the tube in until they fit together. Lever the tube section to one side in order to grip the forward tip section and pull the batten out completely. You will need to place the SBT or needle nose pliers on the tail piece of the batten in order to apply the leverage needed. Separate and apply glue and let dry before inserting. |
|
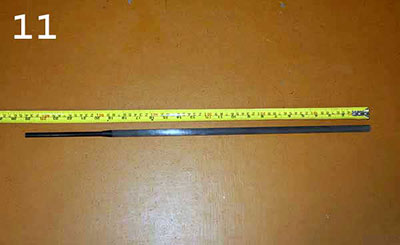 |
11. How to Separate Batten Sections:Once the complete damaged batten has been removed from the batten pocket, the tube section will need to be separated from the tip section. To reduce the cost of the batten, in most cases the forward tapered rod section and the tail-end rod section of the batten can be re-used. Measure the length of the damaged tube section. |
|
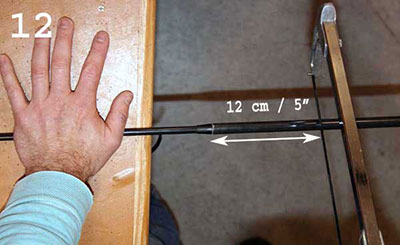 |
12. Remove the damaged Tube:To remove the damaged batten tube from the tapered rod piece. Cut the batten tube 5 inches from the end where it joins the forward tapered rod piece. |
|
 |
13. Place the tapered Rod on a flat surface:Place the tapered rod on a flat surface, reach inside the short cut off tube section and pull down on the needle nose pliers to break away the remaining tube, work around the tube until it is completely removed and the plastic ferrule is exposed and ready for the new tube section to be glued into place. |
|
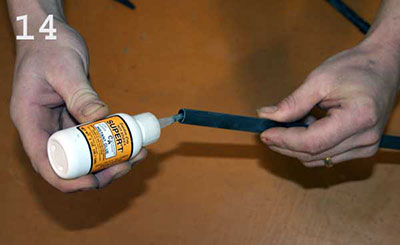 |
14. Gluing the Batten:Upon assemble apply a bead of super glue (cyanoacrylate adhesive) around the inside of the tube, like our Hot Stuff glue kits. Slide the tube over the plastic Ferrule. Spin and push the tube over the ferrule to disperse the glue evenly before it sets. Use this same procedure to re-use the tailpiece. |
|
 |
Batten Delivery:Typically, we will ship tube and rod battens unassembled (in two pieces), as this saves on over-size charges in the shipping cost. Assembly instructions are included, but you will need some instant adhesive to join the two batten sections. Call or email us if you have further questions. Sailworks Toll free (US & Canada): 877-639-7245 All others: + 1-541-386-6561 |
|